
Hermes Gateway as a Loop for Custom Apps
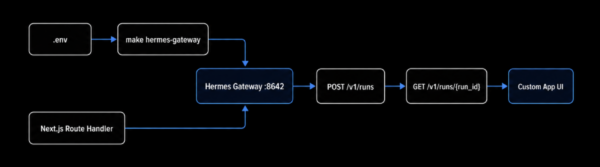
Hermes Gateway turns an agent into a local HTTP service that a custom app can call from its own backend. The useful pattern is a loop: configure the runtime, start the gateway, send a task, poll for completion, return a response to the UI, then iterate on the prompt or route code.
That loop keeps the browser simple. Next.js owns the product experience, Hermes owns the agent run, and .env keeps model keys and gateway tokens on the server.
1. Put Secrets in .env
Use .env as the boundary between your application code and provider credentials. The browser should never receive OPENROUTER_API_KEY or the gateway API key.
OPENROUTER_API_KEY=sk-or-v1-...
API_SERVER_KEY=change-me-local-dev
GATEWAY_ALLOW_ALL_USERS=true
HERMES_API_SERVER_URL=http://127.0.0.1:8642
For a real app, change API_SERVER_KEY to a strong local or deployment secret and read it only from server-side code.
2. Start the Gateway with make
The Makefile gives the team one stable command for starting Hermes as an API server. It checks for the hermes CLI, clears an existing Hermes listener on the gateway port, sources .env, and starts the gateway with the API server enabled.
HERMES_GATEWAY_PORT ?= 8642
HERMES_GATEWAY_KEY  ?= change-me-local-dev

.PHONY: hermes-gateway
hermes-gateway:
	@printf "Starting Hermes gateway at http://127.0.0.1:$(HERMES_GATEWAY_PORT)...\n"
	@cd $(PROJECT_ROOT) && \
		if [ -f "$(HERMES_ENV_FILE)" ]; then set -a; source "$(HERMES_ENV_FILE)"; set +a; fi; \
		HERMES_HOME="$(HERMES_HOME_DIR)" \
		API_SERVER_ENABLED=true \
		API_SERVER_KEY="$(HERMES_GATEWAY_KEY)" \
    hermes gateway
Start it from the project root:
make hermes-gateway
3. Test the Loop Before Wiring the UI
Keep a small curl target in the Makefile. It catches missing environment variables, dead ports, and auth mistakes before the browser gets involved.
.PHONY: hermes-gateway-curl-test
hermes-gateway-curl-test:
	@printf "Testing Hermes gateway at http://127.0.0.1:$(HERMES_GATEWAY_PORT)...\n"
	@curl -s http://127.0.0.1:$(HERMES_GATEWAY_PORT)/v1/runs \
		-H "Authorization: Bearer $(HERMES_GATEWAY_KEY)" \
		-H "Content-Type: application/json" \
    -d '{"input":"/goal Reply with just: OK","instructions":"Minimal test"}' | python3 -m json.tool
Run it after the gateway is listening:
make hermes-gateway-curl-test
The shape you want to see is a successful JSON response with a run identifier or completed output, depending on the gateway response mode.
4. Call Hermes from a Next.js Route Handler
In a custom app, the client should call your own Next.js API route. The route handler signs the request to Hermes with API_SERVER_KEY, sends the user intent, and returns normalized JSON to the UI.
// app/api/agent/run/route.ts
import { NextResponse } from 'next/server';

const HERMES_API_SERVER_URL = process.env.HERMES_API_SERVER_URL ?? 'http://127.0.0.1:8642';
const API_SERVER_KEY = process.env.API_SERVER_KEY;

export async function POST(request: Request) {
  if (!API_SERVER_KEY) {
    return NextResponse.json({ error: 'API_SERVER_KEY is not configured' }, { status: 500 });
  }

  const { input, context } = await request.json();

  const response = await fetch(`${HERMES_API_SERVER_URL}/v1/runs`, {
    method: 'POST',
    headers: {
      Authorization: `Bearer ${API_SERVER_KEY}`,
      'Content-Type': 'application/json',
    },
    body: JSON.stringify({
      input,
      instructions: 'Use the supplied app context and return concise output.',
      context,
    }),
  });

  if (!response.ok) {
    return NextResponse.json(
      { error: 'Hermes run failed', status: response.status },
      { status: response.status },
    );
  }

  return NextResponse.json(await response.json());
}
That route can power any workflow: generating a document, analyzing a record, drafting a support reply, building a task plan, or running a domain-specific tool chain.
5. Poll Runs When Work Is Asynchronous
For longer agent jobs, split creation and polling. The app creates a run, stores the run_id, then checks status until Hermes reports completion.
// lib/hermes-client.ts
const HERMES_API_SERVER_URL = process.env.HERMES_API_SERVER_URL ?? 'http://127.0.0.1:8642';
const API_SERVER_KEY = process.env.API_SERVER_KEY;

const hermesHeaders = () => {
  if (!API_SERVER_KEY) {
    throw new Error('API_SERVER_KEY is not configured');
  }

  return {
    Authorization: `Bearer ${API_SERVER_KEY}`,
    'Content-Type': 'application/json',
  };
};

export async function createHermesRun(input: string, context?: unknown) {
  const response = await fetch(`${HERMES_API_SERVER_URL}/v1/runs`, {
    method: 'POST',
    headers: hermesHeaders(),
    body: JSON.stringify({ input, context }),
  });

  if (!response.ok) {
    throw new Error(`Hermes create run failed: ${response.status}`);
  }

  return response.json() as Promise<{ run_id: string }>;
}

export async function getHermesRun(runId: string) {
  const response = await fetch(`${HERMES_API_SERVER_URL}/v1/runs/${runId}`, {
    headers: hermesHeaders(),
  });

  if (!response.ok) {
    throw new Error(`Hermes poll failed: ${response.status}`);
  }

  return response.json() as Promise<{
    status: 'queued' | 'running' | 'completed' | 'failed';
    output?: string;
    error?: string;
  }>;
}
The important part is that the loop is owned by the server. The browser gets status and output, not credentials.
6. Use a Chat-Compatible Route When the UI Is Conversational
If your custom app has a chat surface, keep the same security boundary. The browser posts messages to Next.js, and Next.js forwards them to Hermes.
// app/api/agent/chat/route.ts
import { NextResponse } from 'next/server';

const HERMES_API_SERVER_URL = process.env.HERMES_API_SERVER_URL ?? 'http://127.0.0.1:8642';
const API_SERVER_KEY = process.env.API_SERVER_KEY;

export async function POST(request: Request) {
  if (!API_SERVER_KEY) {
    return NextResponse.json({ error: 'API_SERVER_KEY is not configured' }, { status: 500 });
  }

  const { messages, appContext } = await request.json();

  const response = await fetch(`${HERMES_API_SERVER_URL}/v1/chat/completions`, {
    method: 'POST',
    headers: {
      Authorization: `Bearer ${API_SERVER_KEY}`,
      'Content-Type': 'application/json',
    },
    body: JSON.stringify({
      model: 'hermes-local-agent',
      messages: [
        { role: 'system', content: 'You are assisting inside a custom application.' },
        { role: 'system', content: `Application context: ${JSON.stringify(appContext ?? {})}` },
        ...messages,
      ],
      stream: false,
    }),
  });

  if (!response.ok) {
    return NextResponse.json(
      { error: 'Hermes chat failed', status: response.status },
      { status: response.status },
    );
  }

  return NextResponse.json(await response.json());
}
This makes Hermes feel native to the product without coupling the UI to model providers, tool execution, or agent runtime details.
7. The Custom App Loop
Once the pieces are in place, the development loop becomes predictable:
- Edit .env for local gateway and provider settings.
- Run make hermes-gateway.
- Run make hermes-gateway-curl-test.
- Add or adjust a Next.js route handler.
- Call that route from the UI.
- Inspect the output, refine the prompt or context, and repeat.
The pattern scales because each layer has a clear job. .env configures secrets, Makefile commands operate the gateway, Next.js signs and normalizes requests, and the custom app presents the loop in the workflow your users already understand.